Wednesday, June 30, 2010

Did You Know...In-A-Pinch Knife Sharpener

Have you ever run across a dull knife and need to sharpen it in a hurry?  In situations like this, the unglazed bottom of a coffee mug might just do the trick!  This tip works especially well on smaller knives.

Applying a moderate amount of pressure, hold the knife at a 20-degree angle and carefully draw the entire length of the blade across the rough surface.

Monday, June 28, 2010

Rosemary and Garlic Focaccia


One of my favorite types of cooking has always been making fresh bread.  Any type of bread will do.  I love the smell of yeast and rising dough.  I can still remember cutting out a section of one of my mom's magazines that covered the making of simple breads.  The same basic recipe but different variations. 

In the beginning I used to knead the dough by hand and there was something satisfying to hold the dough in my hands and work it.  But as the years went on (and the fact I bought a Kitchen-Aid) I started to do the kneading using the machine.  Nevertheless, I still love making bread. 

Though this process takes many hours to complete, the end results are WELL worth it.  I would highly recommend at least trying to make bread just once, you won't be sorry!

Rosemary and Garlic Focaccia
2 3/4 cups all-purpose flour; plus 1/3 cup for adding during mixing
3/8 teaspoon instant yeast
2 cups minus 2 tablespoons room temperature water
3/4 teaspoon sugar
3/4 teaspoon salt
2 tablespoons plus 2 teaspoons extra-virgin olive oil; divided
2 teaspoons fresh rosemary; chopped
6 cloves garlic; peeled and halved
1/4 teaspoon fleur de sel (or sea salt)

1.  Mix the dough:  In the mixer bowl, with the paddle attachment on low speed, combine the flour and yeast. With the mixer running, gradually add the water, mixing just until the dough comes together, about 3 minutes.  It will be very soupy.  Increase the speed to medium and beat until the dough is transformed into a smooth, shiny ball, about 20 minutes.  If after 20 minutes the dough is still a bit wet, you will need to add additional flour slowly until dough starts to come together and pull away fromt the side of the bowl.  Ad the sugar and salt and beat until they are well incorporated, about 3 minutes.
2.  Let the dough rise: Using an oiled spatula or dough scraper, scrape the dough into a 1-1/2 quart bowl, lightlygreased with cooking spray or oil.  The dough will look like melted mozzarella.  Lightly spray or oil the top of the dough.  Cover the container with a lid or plastic wrap.  With a piece of tape, mark the side of the container at approximately where doubled the height of the dough would be.  Allow the dough to rise at about 80F for about 4 hours or until it has at least doubled.
3. Shape the dough and let it rise: Coat the sheet pan with a heaping tablespoon of the olive il.  Pour the dough onto it - it will be thin enough to pour but very stretchy.  Coat your hands with a little of the remaining olive oil and spread the dough as thin as possible without tearing it. Let it relax for 10 minutes, then spread it to almost fill the entire sheet, trying to maintain the bubbles in the dough.  If the dough is still very elastic and resists stretching, allow it to rest for anouth 10 minutes.  Cover the pan with a large plastic box or greased plastic wrap and allow to rise until one and a half times it original volume, about 1 hour.
4.  Preheat the oven:  Preheat the oven to 475F for 1 hour before baking.  Have an oven shelf at the lowest level and place a baking stone or baking sheet on it before preheating.
5.  Sprinkle on the toppings and bake the focaccia: Uncover  the dough and drizle the remaining olive oil evenly over it.  Sprinkle evenly with the rosemary.  Scatter the garlic by tucking it into the dough.  Sprinkle with salt.  Place the pan directly on the hot stone or hot baking sheet and bake for 12 to 14 minutes or until the top is golden.  Remove from the oven and drizzle with extra olive oil, if desired.

Friday, June 25, 2010

Did You Know...Preventing Soggy Pie Crusts

Have you ever made a pie that looked so good on the way into the oven, even better on the way out of the oven, and then when you slice into it found that the crust was soggy? Or, fruit pies that slice up as a sloppy mess because the bottom crust became soggy as it sat out?

There are several tricks you can try to prevent soggy crusts:

>> Choose a glass pie plate or metal pie plate with a dull finish.  If your pie pan is shiny, you might need to bake the crust a little while long for more browning.

>> For double-crust fruit pies, cut slits in the top crust to allow steam to get out.  The escaping moisture will help prevent soggy crusts.

>> Bake your pie in the lower third of the oven.  This will allow the bottom crust to become crisp while the top shouldn't get overly browned.

>> For pie crusts that must be baked prior to filling, brush beaten egg white or whole egg onto the sides and bottom of pie shells (for single-crust pies).  First, place the pastry in a pie plate and prick the bottom and sides with a fork to prevent it from bubbling as it bakes.  Next line the pie shell with a double thickness of heavy-duty aluminum foil.  Bake at 450° for 8 minutes.  Remove foil; bake 5-6 minutes longer or until dry and crisp.  Finally, brush the bottom and sides of the crust with egg, then reheat at 400° for 4 minutes to set the glaze.  Add filling.

Wednesday, June 23, 2010

Quick Cheeseburger Bake

This was a pretty tastey dish.  Easy to make and quite flavorful for such a simple meal. I found this recipe on Recipezaar.

Quick Cheeseburger Bake
1 pound ground chuck
¾ cup onions, chopped
1 large clove garlic; minced
1 10 ¾ ounce can cheddar cheese soup
1 cup frozen mixed vegetables
½ cup milk
2 cups Bisquick
¾ cup water
1 cup shredded cheddar cheese

1. Generously grease a 13x9 inch baking pan. Cook beef and onion in 10-inch skillet until beef is browned; drain.
2. Stir in soup, vegetables and milk.
3. Stir in baking mix and water into baking dish until moistened; spread evenly. Spread beef mixture over batter; sprinkle with cheese.
4. Bake 30 minutes at 400°

Monday, June 21, 2010

An Unusual Graduation Party...One of the BEST!

On Saturday of this past weekend, both Kevin and I enjoyed the gorgeous weather by spending it at my cousin Joe's (pictured below) graduation party.  Joe just graduated from St. Xavier University on Chicago's south side.  He made us all proud graduating with a bachelor's degree in education.

That being said, this wouldn't be a food blog if I weren't going to talk about the most important part - the food!  Joe's mom, my aunt Marian (Menoor, to those that regularly read the blog), gave him the choice of any food he wanted.  First of all, with my family, most people would think Italian - pasta, sausage, or meatballs, but no.  The second most obvious choice would be a barbeque - hot dogs, hamburgers, or potato salad, but no.  Let's go with the third most obvious choice, Chinese - how unique!  Not to mention, one of our favorite foods.
They catered in Chinese food from one of their local favorites.  There was Monogolian Pork with just enough heat and sweet. Fried rice, white rice, Beef Subgum (beef, vegetables and brown sauce), a great chicken dish, and egg rolls, to mention a few. The parents of Joe's girlfriend, Kara, brought in a great veggie pizza as well.  The food was great.  I went back up for seconds, but who wouldn't have guessed it!

And now on to dessert!  One of my aunt's specialties are chocolate-dipped strawberries.  She will make them by the dozens.  Typically they are made with white or milk chocolate and she always finds the juiciest berries. She also made chocolate covered bananas.  My personal favorite.  In addition to those, there were chocolate-dipped fortune cookies, a great chocolate cake, and Coldstone Creamery ice cream cupcakes in a chocolate shell.
It was also great to see all of my family in one place. With all of us scattered over two states, it rarely happens. Joe, we are so proud of you!  We know that with your talent and dedication, you will do great things!  Congrats!  And, thanks again for the great food!

Saturday, June 19, 2010

The Spice of Life...Basil

Sweet basil has a complex, sweet, spicy aroma with notes of clove and anise.  The flavor is warm, peppery, and clove-like with underlying mint and anise tones.

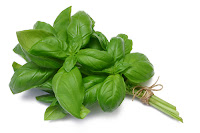
Basil belongs to the mint family, as is clear from the minty, anise notes that accompany its sweetness.  Native to tropical Asia, where it has been cultivated for 3,000 years, it is now grown almost everywhere where the climate is warm enough.  The most common basil, Genoese basil, has large, bright green, silky leaves and small, white flowers.  Good for all Western cooking, it is the best basil for pesto, pistou, and tomato salads.  It combines very well with garlic.

In Western cooking, basil is the natural companion of tomatoes, whether in a salad, sauce, or soup.  It is a good flavoring for poultry too - combine softened butter with chopped basil, garlic, grated lemon rind, and a few bread crumbs, then work the mixture under the skin of a chicken or chicken pieces before baking.  Use basil with fish and seafood, especially lobster and scallops.  It also has an affinity with raspberries.  Basil also works well with corn, cream cheese, eggplant, eggs, lemon, mozzarella cheese, olives, pasta, peas, pizza, potatoes, rice, white beans, and zucchini.

Sweet basil turns black when cooked in a tomato sauce or other acid medium, but retains its flavor.  It quickly loses its aroma when cooked, so use it in a dish for depth of flavor, then stir in a little more to add fragrance when the cooking is finished.

Most basils are tender annuals.  Basil grows easily from seed, and needs a sheltered, sunny position in rich, well-drained soil.  In cooler climates it prefers a greenhouse or a windowsill.  Delay flowering and encourage bushiness by pinching out the tops.  Harvest until the first frost.

Basil leaves bruise and wilt easily, so avoid bunches with drooping or blackened leaves.  Store for 2-3 days in a damp paper towel or plastic bag in the refrigerator vegetable crisper.  One of the best ways to preserve basil is to puree the leaves with a little water or olive oil and freeze in ice-cube trays.

Some other common basils are Purple Basil best used with rice, grains, and salads.  Bush Basil, also called Greek Basil is a compact bush with small leaves and pepper aroma.  Cinnamon Basil is native to Mexico and has a pronounced, sweet scent with clear cinnamon notes and works well with bean and legume dishes along with spicy, stir-fried vegetables.  African Blue basil has leaves that are mottled green-purple with purple flowers.  It is strongly scented with peppery, clove, and mint notes.  Use it with rice, vegetables, and meats.  It is very good in potato salad and makes an outstanding pesto.  This basil is a perennial as long as it is kept frost-free.

Tuesday, June 15, 2010

Manicotti

When I was a kid I could remember my grandmother making several dozen crepes.  She used them for her homemade manicotti.  Any Italian will tell you that THE best manicotti are not made with those store-bought noodles but with light, thin crepes. We had them with meatballs and homemade foccacia.

The crepe batter is very similar to that of pancake batter only it is a bit thinner.  In the time you need to boil the water and cook the noodles, you could have made a batch of crepes. So, take a shot, whip up a bunch of crepe batter and make a batch of manicotti.


Crepes:
1- ½ cup flour
1- ½  cup milk
4 eggs
pinch of salt

1.  Mix all and spoon into hot pan (medium-high heat).  Swirl batter in pan to coat bottom thinly.  Cook until bubbles as you would crepe.
Filling:
1 pound ricotta
1 egg
1/4 cup grated parmesan
1 tablespoon chopped parsley
salt and pepper to taste

1.  Mix filling in bowl of food processor until combined.   
 2.  Using the following photos as a guide, fill and roll crepes.


3.  Once all crepes are done.  Spoon marinara sauce (about 1/2-inch) in the bottom of baking dish.


4. Top with sauce and bake covered at 350° for 30 minutes.  Uncover and continue to bake for 15 minutes.  Top with additional Parmesan cheese and serve.

Monday, June 14, 2010

Sour Cream and Cheddar Potatoes

These creamy, cheesy potatoes are a must to take with to any potluck.  They are also easy enough to prepare during the week.  I tested this recipe over Memorial Day weekend and they turned out great.  The combination of the cream cheese and sour cream were the clincher on this one.  Makes 8 servings.  You may also cut this recipe in half as I did and it will work out fine.
Sour Cream and Cheddar Potatoes
10 medium red potatoes, peeled and quartered
1 8 ounce package cream cheese; cubed
1 cup sour cream
½ cup shredded cheddar cheese
¼ cup milk
2 tablespoons butter; divided
1 tablespoon dried parsley
1 ¼ teaspoon garlic salt
¼ teaspoon paprika


1. Place potatoes in a large saucepan and cover with water. Bring to a boil. Reduce heat; cover and cook for 15-20 minutes or until tender. Drain.
2. In a large mixing bowl, mash the potatoes. Add the cream cheese, sour cream, cheddar cheese, milk, 1 tablespoon butter, parsley and garlic salt; beat until smooth.
3. Spoon into a greased 2-quart baking dish. Dot with remaining butter; sprinkle with paprika. Bake, uncovered, at 350˚ for 30-40 minutes or until heated through.

Friday, June 11, 2010

Pudding Cookies

This recipe was from a holiday cookie cookbook. I made them using chocolate pudding.  The pudding is not overwhelming in these cookies.  They were easy to make and baked up very nicely.  The cookies turned out  soft and chewy.
1          cup butter; softened
1          cup canola oil
1          cup sugar
1          cup confectioners’ sugar
2          eggs
1          teaspoon vanilla extract
1          3.4 ounce package instant pudding
4          cups all-purpose flour
1          teaspoon cream of tartar
1          teaspoon baking soda

1. In a large bowl, cream butter, oil and sugars until light and fluffy.  Beat in eggs, vanilla and dry pudding mix.  Combine the flour, cream of tartar and baking soda; gradually add to the creamed mixture and mix well.
2.  Drop by tablespoonfuls 2 inches apart on ungreased baking sheets. Flatten with a glass dipped in sugar.
3.  Bake at 350˚ for 12-15 minutes or until lightly browned. Remove to wire racks to cool.

Thursday, June 10, 2010

Chuckwagon Beans

I made these beans over the Memorial Day weekend. They are great for large family gatherings, pot-lucks and cookouts! This is very hearty; not mushy at all.  This dish could probably be made as a main dish with the additon of pork, beef, or some old-fashioned cut up hot dogs.  Enjoy! his makes 8 servings.

         lb ground beef, browned
         medium diced onion
½         lb bacon, cook crisp and save drippings
         16 ounce can great northern beans
         16 ounce can kidney beans
1          16 ounce can pork n' beans
½        cup brown sugar
½        cup white sugar
½        cup ketchup
½        tablespoon prepared yellow mustard
         tablespoon molasses
         dash Worcestershire sauce

1.  Cook bacon.
2.  Brown ground beef with the diced onion.
3.  Place first 3 items in a large oven roaster (I use an Enamelware roaster).
4.  To this, add the 3 cans of beans; do not drain beans.
5.  Mix all other ingredients together in a medium bowl.
6.  Pour over meat and beans and stir well.
7.  Bake at 350˚ for 1 hour covered.
8.  Remove lid or foil and bake for 20 more minutes. 

Monday, June 7, 2010

Orange Pretzel Torte

I made this dessert over the Memorial Day weekend up at the cabin.  I wasn't sure how it would taste but we really enjoyed it.  This torte makes light, cool, and refreshing additional to any meal.  This would also be very good to take to a potluck.
2          cups crushed pretzels
3          teaspoons plus ¾ cup sugar; divided
¾        cup butter; melted
2          3 ounce each orange gelatin
2          cups boiling water
2          8 ounce cans crushed pineapple; drained
1          11 ounce can mandarin oranges; drained
1          8 ounce package cream cheese; softened
2          cups frozen whipped topping; thawed
            Additional whipped topping for serving

1.  In a small bowl, combine pretzels and 3 teaspoons sugar; stir in butter.  Press into an ungreased 13x9-inch baking dish.  Bake at 350˚ for 10 minutes.  Cool on a wire rack.
2.  In a large bowl, dissolved gelatin in boiling water.  Add pineapple and oranges.  Chill until partially set, about 30 minutes.
3.  In a small mixing bowl, beat cream cheese and remaining sugar until smooth.  Fold in whipped topping.  Spread over crust.  Gently spoon the gelatin mixture over the cream cheese layer.  Cover and refrigerate for 2-4 hours or until firm. 
4.  Cut into squares.  Garnish with additional whipped topping.

Friday, June 4, 2010

Mediterranean Fettuccine

Earlier in the week we had this great pasta salad.  We are planning a trip to Greece next summer so I thought this would be a great fit.  This makes a wonderfully light summer meal.  Makes 2 servings.
Mediterranean Fettuccine
½        cup Vegetable Broth
8          each sun-dried tomatoes (not in oil), halved
6          ounces fettuccine, uncooked
1          each red and yellow bell pepper, chopped
1          cup green onions, chopped
2          cloves garlic, minced
1/4      teaspoon red pepper flake
1          tablespoon olive oil
10        Greek Olives, pitted and coarsely chopped
¼        cup fresh basil, minced
1          tablespoon capers, drained
1          teaspoon dried oregano
1          4 ounce feta cheese, crumbled

1.  In a small saucepan, bring broth to a boil.  Remove from the heat; add tomatoes.  Let stand for 5-7 minutes.  Cut tomatoes into thin slices and return to broth; set aside.
2.  Cook fettuccine according to package directions.  Meanwhile, in a large nonstick skillet coated with nonstick cooking spray, sauté the peppers, onion, garlic, and red pepper flakes in oil for 3-4 minutes or until tender.  Reduce heat.  Stir in the olives, basil, capers, oregano and reserved tomato mixture; heat through.
3.  Toss the fettuccine with the vegetable mixture and add the feta cheese.